[Top] [Prev] [Next] [Bottom]
[Contents]
Tutorial 2: Making and Using a DSQL Data Object
In this tutorial, you will create a DSQL Data Object and use it in your Project CGI. When the user clicks a link, selected information from your database will be displayed using a format of your choosing. This sort of binding was used in the Bookstore to display an up-to-the-minute list of books from the database.
Be sure that you have created a DSQL directory $HOME/dsql and set the environment variable DSQLDIR to point to it. Then start Sapphire/Web, if it is not already running.
- 1. If the Project Window is not currently displaying
test.pj, select File->Open from the menu bar and open test.pj.
- 2. Bring up the Document Manager by clicking the Document Manager icon or by selecting the menu item
Tools->Document Manager...
- 3. Select end.html and click the
Edit HTML icon (Fig. 3-2).
- 4. Using your HTML editor, change end.html to the following:
	<HTML>
	<HEAD><TITLE> Final Document </TITLE></HEAD>
	<BODY>
	This is the final document. Insert Data here:
	<P>
	##Sa_DataDropSite##
	</BODY>
	</HTML>
- What is
##Sa_DataDropSite## ? It is a Data Site, a place where the results of a Data Object may be placed. Feel free to name the Data Site anything you want, so long as it has the syntax ##Sa_xxxxx##, where xxxxx is the variable name by which you will refer to the Data Site.
- 5. If you select end.html and click the
Preview HMTL button, you should see the page below (Fig. 3-8).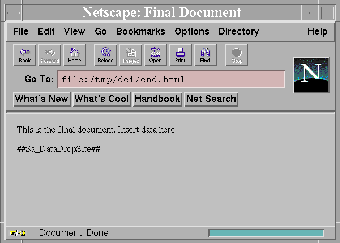
Figure 3-8 HTML Browser Screen
Creating a DSQL Data Object
Now that you have the two HTML documents and a Data Site, the next step will be to create a DSQL Data Object.
- 1. In the Project Window, click the
Object Editor icon (Fig. 3-1) or select the menu item Tools->Object Editor.
- 2. From the Object Editor, select the menu item
File->New. An intermediate window will pop up.
- 3. In the top combo box, select DSQL by clicking the down arrow button.
- 4. Select your database server from the Server list. A database login window will appear.
- 5. Enter your database username and password. If you do not know these, please consult your database administrator. You could also try system defaults like informix/informix, oracle/oracle, sybase/sybase, or dbo/[no password]. Note the database username and password for later use.
- 6. After you have successfully logged into the database server, select your database from the Database list. You are probably using
pubs2.
- 7. Once the database server and database are selected, enter
test_db in the Selection text field at the bottom of this window. Click Ok.
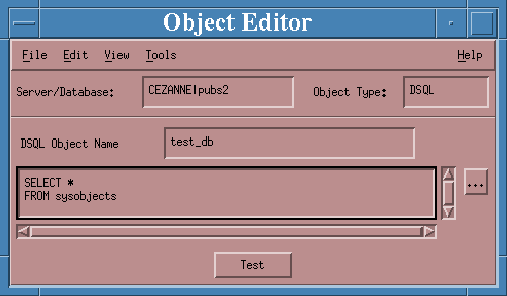
- 8. Enter one of the following SQL statements into the Object Editor (Fig. 3-9), depending on your database vendor:
- Sybase:
	SELECT *
	FROM sysobjects
- Oracle:
	SELECT *
	FROM ALL_OBJECTS
- Informix:
	SELECT *
	FROM systables
Testing the DSQL
- 1. Click the
Test button at the bottom of the Object Editor window. If your DSQL works correctly, an Object Results Viewer window will appear.This window should list the return columns and rows from the database.
- 2. Click
Ok to close the Object Results Viewer.
- 3. Save your DSQL object by selecting the menu item
File->Save in the Object Editor window.
- 4. At the Object Bind Editor, select
File->Close.
Creating an Object Binding
You have created a dynamic SQL (DSQL) object that queries a database system structure. You will now create an Object Binding that puts this data into an HTML template when an Anchor is clicked. This Anchor will be the same here hyperlink that you used in the last project.
- 1. First you will delete the old binding to the Anchor. In the Project Window, select
begin.html<A>GO from the Activators list.
- 2. Click the
Delete Activator icon (Fig. 3-1).
- 3. Open the Object Bind Editor by clicking the
Object Bind Editor (New Activator) icon or by selecting the menu item Tools->Object Bind Editor. An intermediate window will pop up.
- 4. In the document section, select begin.html. In the Anchors section, select
GO. Click Ok.
- 5. Another window will pop up. In this window, click on the arrow button to bring up a menu of bind types. Select DSQL.
- 6. Select the database server and database that were previously selected. Your DSQL object should appear in a list called
DSQL Name.
- 7. Select your object (
test_db) and click Ok. This will enable the Object Bind Editor.
- 8. From the Object Bind Editor, select end.html as the
Results<=>Template. The data returned by test_db will populate the Data Sites in end.html.
- 9. The bottom half of the window contains a list of return columns from
test_db. Click the arrow to the right of the first column. This will pop up a list of possible data drop sites (in this case [None] and DataDropSite).
- 10. If you want to display this return column (in our case,
name sysname (30)) in end.html, click on DataDropSite to select it. If you don't want this return column displayed, click [None].
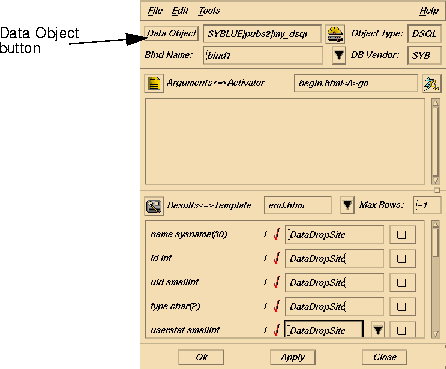
Figure 3-10 Selecting end.html
- 11. Click the next text field, and select a Data Site. Continue for as many return columns as you want to display. When you are finished, click
Ok to close the Object Bind Editor.
- 12. In the Project Window, select the menu item
Edit->Options. The Options Editor will pop up. In the top combo box, select Test and set the Database Server, Database User Name, and Database User Password to the appropriate values. This will allow you to access database information as an anonymous WWW user. Click Ok.
- 13. Click the
Test icon.
- 14. A Web browser will display your first HTML document. Click here to go the next page. The second HTML document should be populated with data from the database.
Optional
If you chose to display more than one return column, the data displayed in end.html was somewhat unreadable. In this section, you will format the return columns so that the user can read them easily.
- 1. In the Project Window, select
begin.html<A>GO from the Activators list.
- 2. Click the
Object Bind Editor (Selected Activator) icon (Fig. 3-1). This will open the Object Bind Editor with the attributes for begin.html<A>GO.
- 3. You want to change the way that the results are formatted, so all of your changes will be made in the
Results<=>Template section of the window. Click the Results Detail Editor button to the right of the first return column you want to format (Fig. 3-11).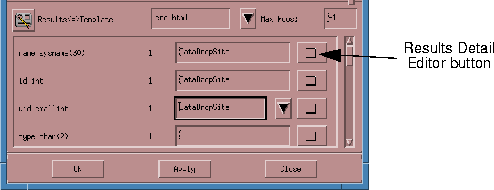
Figure 3-11 Portion of Object Bind Editor
- 4. The Results Detail Editor will appear (Fig. 3-12). Click on the arrow to pop up a list of available Population Callbacks. A Population Callback is used to format data before it is sent to the HTML document Data Sites. You can write your own Callbacks, but in this case you will use one that comes with Sapphire.
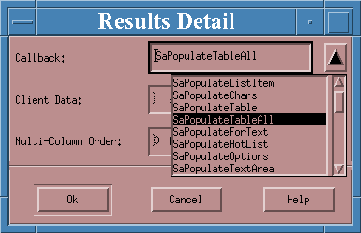
- 5. Select the Population Callback
SaPopulateTableAll.
- 6. If you would like more information about the workings of this Population Callback, click
Help and your browser will display the relevant help page. When you are done, click Ok to close the Results Detail Editor.
- 7. Notice that the Results Detail Editor button next to your chosen return column is now checked off. To remove a Population Callback from a results column, open the Results Detail Editor, highlight the name of the Callback, and delete it.
- 8. Repeat steps 3-6 for each return column you have chosen to display. When you are done, click
Ok to close the Object Bind Editor.
- 9. Click
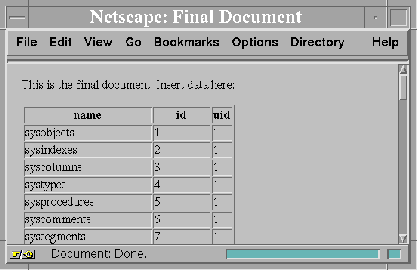
Test in the Project Window. Your browser will display begin.html. Click here to display your results page. Your data should now be neatly organized in a table (Fig. 3-13).
Tutorial 3: Creating and Using a File Data Object
In this section, you will learn how to create a File Data Object and use it to build an HTML database application. You will also learn to create an Alias to an Activator.
Before starting this tutorial, you should have completed tutorials 1 and 2. If you do not want to overwrite the project file from tutorials 1 and 2, create a directory $HOME/tut3 and change into it:
mkdir $HOME/tut3
cd $HOME/tut3
You will also need to copy some project files into whatever directory you choose to contain this project:
cp $SAPPHIRE/tutorials/tutorial3/html/* $HOME/tut3
If you have not already done so, start Sapphire/Web:
saweb tut3.pj &
If you are already running Sapphire/Web, select File->New in the Project Window and name your new project tut3.pj (in your tut3 directory).
- 1. In the Project Window, click the
Object Editor icon (Fig. 3-1) or select Tools->Object Editor.
- 2. In the Object Editor window select
File->New. You create a new Data Object.
- 3. Click the down arrow next to
Object Type. Select FILE and enter guestBook in the Selection text field. Click Ok.
- 4. In the Object Editor window enter
gbook.txt in the File Name text field. This is the name of the file that the File Data Object guestBook will use to store information.
- 5. You must tell the Object Editor how to split up the contents of the file. You will be storing first and last names, so you will need two columns. Therefore, you will specify a Column Delimiter and a String Delimiter.
- A Column Delimiter specifies what character separates the columns in the file.
- A String Delimiter specifies what character will be placed at the beginning and at the end of each of the column, in a row of data.
- Note: You will need a string delimiter if there is the possibility that the column delimiter is part of the value in a column. For example, an address line might contain a comma, so it should be wrapped in some other character (usually quotes) so that the parsing code will ignore the commas within the fields.
- 6. Enter
, (a comma) in the Column Delimiter text field.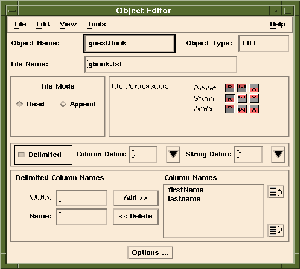
Figure 3-14 The Object Editor
- 7. Enter
" (double quotes) in the String Delimiter text field.
- Now you can name the columns that are going to be in your file.
- 8. Under
Delimited Column Names enter firstName in the Name text field.
- 9. Click the
ADD>> button
- 10. Under
Delimited Column Names enter lastName in the Name text field.
- 11. Click the
ADD>> button
- 12. The Object Editor should resemble Figure 3-14 above. Save the file object by selecting
File->Save from the Object Editor.
- Notice that the
Read button in the File Mode radio box is selected by default. The Data Object guestBook will be used to read your list of names. You will also want an object that can append names to your file.
- Since you have already created the "read" version of your Data Object, it will be easy to write the "append" version. All you must do is change the file mode to
Append and save the Data Object to a new name.
- 13. Click on the
Append button in the File Mode radio box.
- 14. Select the
File->Save As.
- 15. Enter
guestBook_append as the name of the new Data Object. Click Ok.
- 16. From the Object Editor select
File->Close.
Adding HTML Documents
All of the HTML files you will need for this tutorial have been delivered with Sapphire/Web. You will use the Document Manager to add them to the project. Once they have been added, feel free to select a document and click the Edit HTML icon (Fig. 3-2) to examine the documents more closely.
- 1. From the Project Window, click the
Document Manager icon (Fig. 3-1).
- 2. From the Document Manager click the
Add HTML Icon (Fig. 3-2). From the Add Document window select all of the HTML files and click Ok. The selected HTML documents should now be listed in the Document Manager window (Fig. 3-15).
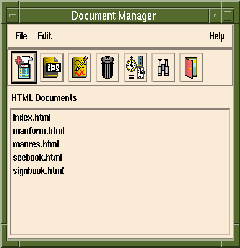
Figure 3-15 The Document Manager
- 3. Select index.html and click the
Preview HTML icon (Fig. 3-2) to see what the first page of the project will look like to the user.
- 4. In the Document Manager, select
File->Close.
- 5. From the Project Window select
Edit->Options Editor.
- 6. Click the down arrow across from
Category and select Project.
- 7. Select the
HTML Startup Document Option.
- 8. Click the ... button to open the
HTML Startup Document window.
- 9. Select index.html and click
Ok.
- 10. Click
Ok to close the Options Editor.
Creating Object Bindings
The first binding that you create will define the SignBook anchor in index.html. When this anchor is clicked, the project CGI will play the signbook.html template. There is no dynamic data on this page, so you will use a NULL Data Object.
- 1. From the Project Window click the
Object Bind Editor (New Activator) icon. The Activator Selector window will appear.
- 2. Select index.html from the
Document list.
- 3. Select
HREF=SignBook from the Anchor list.
- 4. Click
Ok to close the Activator Selector.
- 5. Click the down arrow across from
Object Type and select NULL. Click Ok.
- 6. Click on the down arrow in
Results<=>Template and select signbook.html. Click Ok.
The NULL binding is finished. Clicking on the SignBook anchor will take the user to signbook.html with no attempt to process any data.
The next binding that you create will define the SeeBook anchor in index.html. When the anchor is clicked, the project CGI will play the seebook.html template. The guestBook File Data Object will be used to populate the dynamic data in this document.
- 1. From the Project Window select
Object Bind Editor (New Activator) icon. This will bring up the Activator Selector.
- 2. From the
Document list select index.html.
- 3. From the
Anchors list select HREF=SeeBook. Click Ok to close the Activator Selector.
- 4. From
Object Type select FILE.
- 5. From the
File Objects list select guestBook. Click Ok to close the Activator Selector.
- 6. Click the down arrow in
Results<=>Template and select seebook.html.
- 7. Click the down arrow next to the
firstName Result Argument and select the FirstName Data Site, binding the argument to the site. This will put the file data called firstName in the seebook.html Data Site called FirstName.
- 8. Repeat step 7, this time binding the
lastName Result Argument to the LastName Data Site. Click Ok.
The next binding that you create will allow a user to submit data-in this case, the user's first and last names. This will be done using the Submit button function on the form in the signbook.html document. When the Submit button is clicked, the CGI program will append what the user's name to the end of the guest book file, and then show the updated guest book to the user.
Two bindings will be created for the Submit button Activator. The guestBook_append File Object will be used to add data to the file, and the guestBook file object will be used to put the guest book data in the seebook.html document.
- 1. From the Project Window select the
Object Bind Editor (New Activator) icon.
- 2. Under
Document list select signbook.html.
- 3. Under
Form select ACTION=FormAction. Click Ok.
- 4. For
Object Type select FILE.
- 5. Select
guestBook_append. Click Ok.
- In this binding, you will be getting data, not displaying it. Therefore, you will need to modify the
Arguments<=>Activator part of the binding.
- 6. Under
Arguments<=>Activator, bind the firstName Argument to the FirstName Form Element.
- 7. Bind the
lastName Argument to the LastName Form Element. Click Apply.
- You have created a binding that appends the form data to the guest book file when the
Submit button is clicked. Clicking the Submit button should also show the user the updated contents of the guest book. You will create this second binding without exiting the Object Bind Activator.
- 8. Click the
Data Object button (Fig. 3-10).
- 9. For
Object Type select FILE.
- 10. Select
guestBook. Click Ok.
- 11. In the Object Bind Editor from
Results<=>Template choose seebook.html.
- 12. Bind the
firstName Result Argument to the FirstName Data Site.
- 13. Bind the
lastName Result Argument with the LastName Data Site.
- 14. Click
Ok.
Creating and Using an Alias
An Alias is an exact copy of an Activator. If your project will involve several Activators that do the same thing, you can save time by creating one of the Activators and making the rest Aliases to the first.
The first alias you create will cause the SignBook Anchor in the seebook.html document to execute the same code that is called when you click the SignBook Anchor in the index.html document. As you may remember, the SignBook Anchor shows a form for the user to enter a name.
- 1. From the Project Window, select
Tools->Alias Manager or click the Alias Manager icon (Fig. 3-1).
- 2. From the Alias Manager, click the down arrow and select
index.html<A>SignBook.
- 3. From the Alias Manager, click the
Add Alias icon or select the menu item Edit->Add... .
- 4. Select seebook.html from the
Document list.
- 5. Select
HREF=SignBook from the Anchor list. Click Ok.
The next alias you create will cause the SeeBook anchor in the signbook.html document to execute the same code that is called when you press the SeeBook anchor in the index.html document.
- 6. Select
index.html<A>SeeBook from the Activator combo box.
- 7. Click the
Add Alias icon or select Edit->Add... .
- 8. Select signbook.html from the
Document list.
- 9. Select
HREF=SeeBook from the Anchor list. Click Ok.
- 10. Select
File->Close.
- 11. From the Project Window select
File->Save.
Testing Your Project
Before you try out your project, you must make sure that a user will have permission to write to the guest book file. The directory entered as the Test.HTML Path option must be writable by the user on the http server that runs the CGI. Many servers have the CGIs run as user nobody. In order for the user nobody to write to a file, the file must be writable by every user on the system. To ensure that the Test.HTML Path is writable, you'll need to use the UNIX command chmod 777 on the directory pointed to by the Test.HTML Path option.
For example, if the value of the Test.HTML Path option is /usr/users/dei/public_html, a user would enter the command
chmod 777 /usr/users/dei/public_html
at the UNIX prompt.
If you do not want to allow everyone to write to this directory, you will need to create a file in that directory that is writable by every user.
For example:
touch /usr/users/dei/public_html/gbook.txt
chmod 777 /usr/users/dei/public_html/gbook.txt
If you want more information about security concerns you should read the appropriate sections of the User's Guide and Installation Guide. For more information about chmod, run the UNIX command man chmod.
Click the Test icon in the Project Window. If everything is configured correctly, your browser will display the index.html page.
You will now add names to the Guest Book to test the Data Objects.
- 1. Click the
Sign Guest Book Anchor.
- 2. Enter your first name and last name in the two text fields and click
Add Name.
- 3. Your your first and last name should appear in the Guest Book list. If your name does not appear in the file, and the page displays "Cannot open file" error messages, make sure that you correctly entered the
chmod command described above.
- 4. Click
Sign Guest Book to add another name to the list.
- 5. Continue adding names to verify that your server application is working correctly (Fig. 3-16).
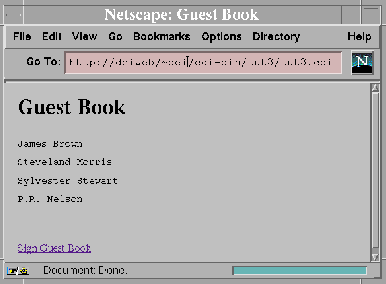
Figure 3-16 The working Guest Book
[Top] [Prev] [Next] [Bottom]
[Contents]
info@bluestone.com
Copyright © 1997, Bluestone. All rights
reserved.


